
This month we will be sharing content emphasizing ways to use summer to develop yourself. If you are a professional, summertime may not be the same, so we hope you can still utilize these while juggling everything else! We understand it may be difficult to juggle life, friends, and honing one’s craft, so please plan out your goals to avoid burning out!
If you aren’t familiar with or used AutoCAD much, we will be sharing some tips that will save you time and headaches! Not everyone may have the chance to use AutoCAD, but sooner or later, you will probably end up using some form of computer-aided drafting (CAD), which will have a similar workflow. AutoCAD was developed and marketed by Autodesk for architects, engineers, and construction professionals to create precise 2D and 3D drawings. Without further ado, here are 5 tips that will help facilitate a quicker workflow of the industry’s staple that establishes a good foundation for many others! It’s important to note that the images below are stitched from multiple images to illustrate the process better, so it will not look the same when attempting this.
1. Shortcuts + Customization
One of the greatest hacks for any software, and the first thing to accomplish is learning the shortcuts! This isn’t new for anyone, but what if I said you could customize the shortcuts in AutoCAD even further? I recently learned this trick and thought, ‘if I knew this sooner, how much time I could have saved!’ How how do you set up your own shortcuts? When you open up AutoCAD, you’d want to click on the “Manage” tab, then click on “Edit Aliases,” and this window should pop up!

From here, you can customize all the shortcuts you need to one or a few keys to do multiple tasks. It’s important to make sure there are no duplicates in this notepad, or AutoCAD will be confused about what you are attempting to achieve.
2. Interface Customization
Just like shortcut customization, interface customization is the next best thing to get situated with. The first thing I always do when I’m opening a new software, “How do I switch this to black or dark scheme?” Luckily, it’s effortless. Type “Settings” in the command bar, and a window will pop up, which will give you multiple options to adjust the display, drafting, or user preferences settings. Take the time to explore those options and adjust to your liking! In addition, there are other ways to customize your interface, and I’ll break down some things in the image below!
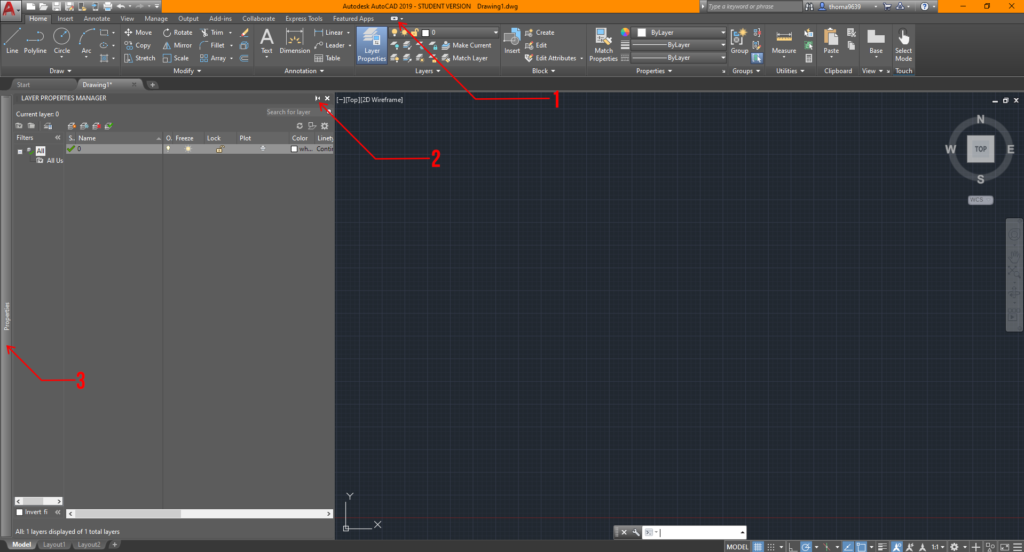
- This button controls the ribbon area, and you can cycle through multiple settings depending on how you like it. I normally go with the ribbon option shown in the image because it’s easier to navigate than the others.
- This option is available for most pop-up tabs that occur in AutoCAD. This symbol essentially asks if you’d like this window to be added to your sidebar. It also toggles whether you want the tool window to stay locked or hidden when not used.
- The sidebar is where you’d find any anchored tool window you’d like. I usually keep my properties tab locked but place my “Layer Properties” and “External References” anchored and automatically withdrawn if not used to the side for quick access.
3. Blocks
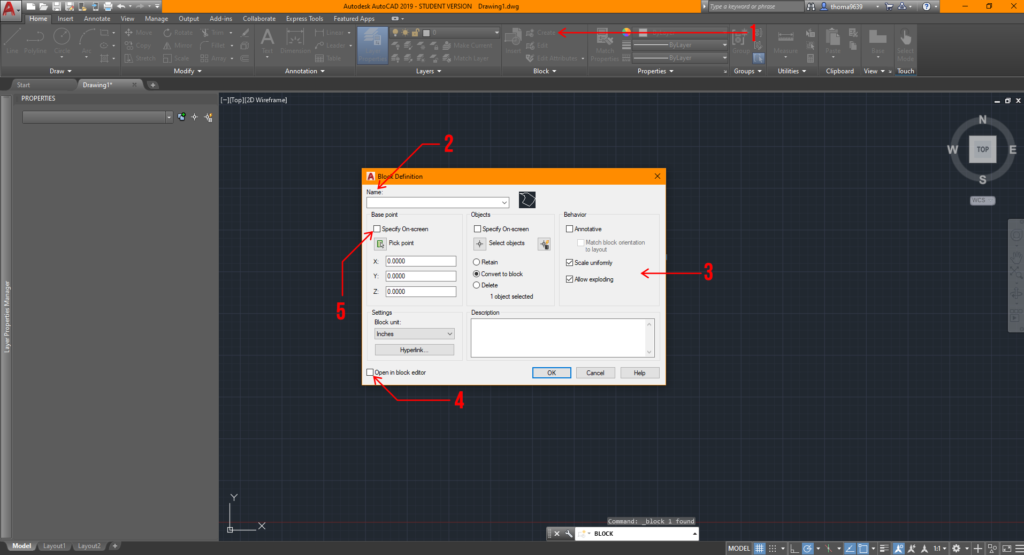
Looking back, I want to facepalm myself because I could have made changes so quickly utilizing blocks in AutoCAD! Blocks basically allow you to edit multiple instances of the same block at once. There are two effortless ways to access it; option 1, under the “Home” ribbon, you can go over to the block tab to create or insert any blocks. Option 2, under the “Insert” ribbon, there’s a bigger block tab that can help you learn what the image stands for, but either option will get you to the same result! Ideally, you’d want to create the object first using any tools under the option and modify tab. Once you’ve done that, select the lines, then click the “Create Block” button. This window should pop up!
You can choose to select the object after, but I find it easier and quicker to select the lines and/or objects first before creating the block.
- Click this button for the “Block Definition” window to pop up after selecting the lines and/or objects for the block.
- This is where you should name the block so it will save you time finding it!
- These are some settings you’d want to adjust eventually; for your sake, the settings shown will be ideal before adjustments.
- It’s ideal to uncheck this box because it’s unnecessary to edit the block right away if you’ve drawn it correctly beforehand. Don’t worry. You can always edit the block by right-clicking the object and find the “Edit Block” option.
- Make sure to select this option to set the base point of the block. Otherwise, it may cause complications later on!
4. xRefs or xReferences
Another great hack in AutoCAD is learning how to operate xRefs; they are essentially any viable file that can be placed into the drawing to use as a reference, like PDFs, JPGs, or other DWGs. This could be extremely helpful if you were making an addition to other projects, or your project has specific site conditions you’d want to display! This is also a great practice in professional settings for several reasons. First, it allows multiple people to work on different files and still reference each others’ work. Second, it keeps each file clutter-free, lightweight, and focused on the relevant parts of the project. Third, it allows you to swap out versions/iterations by replacing xRefs quickly. Here’s how you can bring one in:
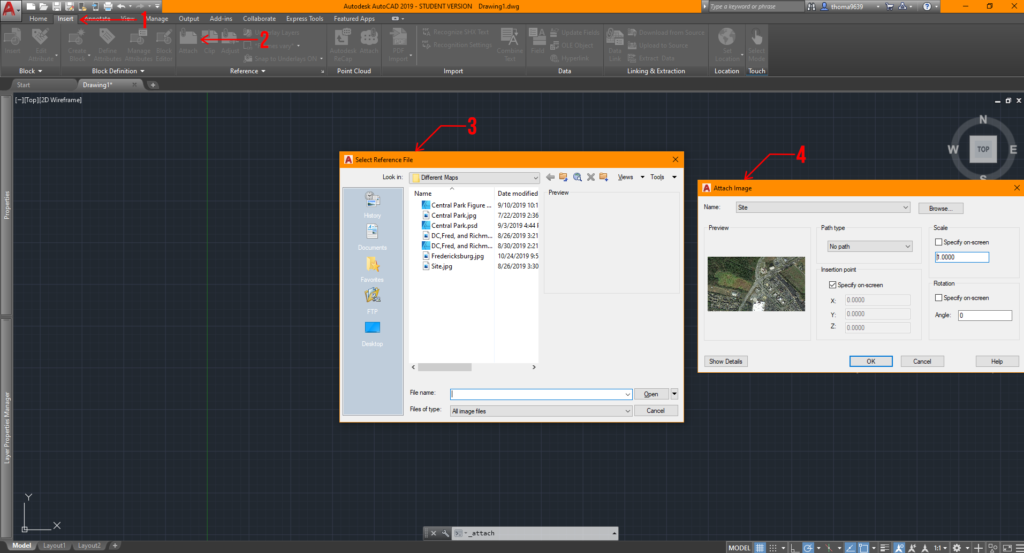
- Click on the “Insert” ribbon.
- After that, go ahead and click on “Attach.”
- This window will pop up for you to select what file you want to use as a reference.
- After making your selection, a second window will pop up, and I have already set general settings for your convenience. You could make more adjustments to these settings once you have learned the process!
5. Sheet Layout + Viewport Control
Let’s say you want to export a drawing without certain features but don’t want to waste time to recreate it or copy multiple views causing your file to slow down. What do you do? Sheets and viewport control is your best friend! Now I never really used this feature until I got into the office, but still, I’m sure it will save you some time too! Assuming that you have a drawing in AutoCAD and it’s situated near the origin (0,0) in the model space, here are the steps you can do to maximize your efficiency in exporting views.
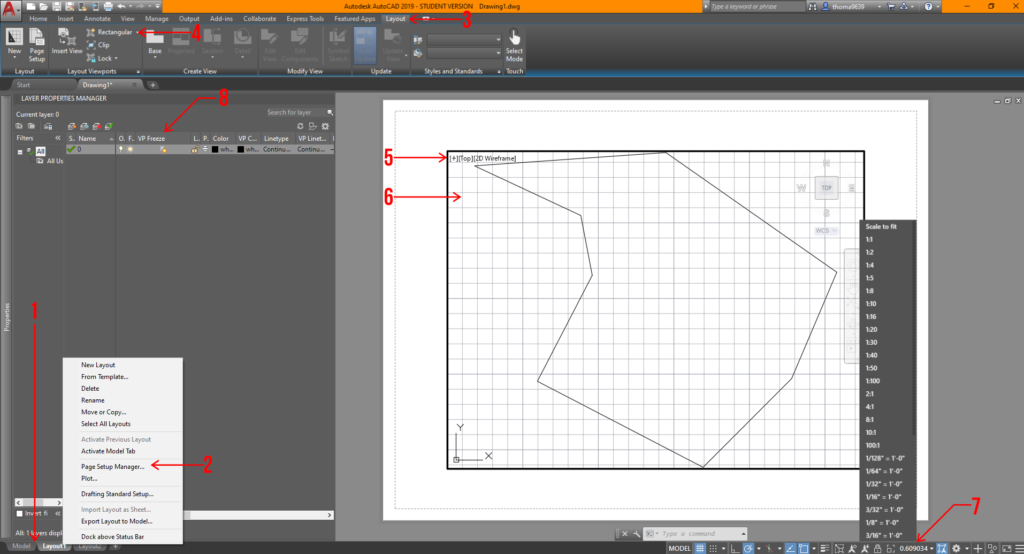
- In AutoCAD, the space you work in is called the “Model” space, so if you want to control your sheets for drawings and views, you will want to click on the tabs below to set that up. You can add sheets by hitting the “+” sign or right-click on a tab to add a sheet.
- You should confirm the sheet size or settings you will want to export the drawing in by right-clicking the sheet tabs and click the “Page Setup Manager” option. From there, another window will open and a few more adjustments based on your needs.
- Select this tab to create a viewport or view on the sheet. Viewports is another way to see your drawing, imagine it’s a camera snapshot of the model space, which you can control certain settings that won’t affect the model space!
- To create a viewport, click on this item. Now, you can have organic-shaped viewports, but in this scenario, let’s keep it simple. Once you click on it, all you have to do is draw a rectangle that fits your sheet, and you can always adjust if needed.
- This is the rectangular viewport.
- You can double-click into the viewport and use the mouse wheel to locate what you want visible in the box. If you want to exit the viewport space, double-click on the sheet or the colored edge surrounding the drawing.
- After selecting the frame of the viewport, you can control the scale of the drawing by clicking on the scale symbol at the bottom right corner. Make sure to lock the view by clicking the lock symbol next to the scale symbol. This makes your viewport fixed on what you are showing.
- You can turn off layers in specific viewports by opening your “Layer Properties,” find the tab that says “VP Freeze,” and click on the symbol with the sun. This is similar to freezing a layer, but instead of turning it off for the entire drawing, it will only turn it off for that view.
This is a rather advanced technique in AutoCAD, so there’s a lot of playing around with this last one. However, if you learn this sooner, especially with the iterative process of school and work, it can save you a lot of time and headaches.
These tips vary in levels of understanding of AutoCAD; nonetheless, these should help you learn the software even faster! That’s all we got for today! I hope you found this article helpful, and if you have any tips for future students, please let us know in the comments below. Make sure to follow our YouTube and Instagram for more content!