4 Ways to Improve Your Sketching

Have you ever felt your sketching lacked the same amount of depth or detail compared to those of your peers or what you see on social media? Well, we have raved about how sketching is an amazing skill to have in a growing digital world in previous articles. However, let’s actually talk and breakdown ways to improve your sketching!

Here are four of our favorite tips on how Archi Hacks’ team has improved our sketching skills. Also, I will be sharing some of my sketches from my study abroad program, illustrating some of the techniques and thinking behind my improvement.

Confidence

Believe it or not, your lines reflect how you feel, so an important lesson I learned through countless hours of sketching and listening to my professor is being confident in my lines.

The best way to build that confidence is practice! You all saw this one coming, but natural talent only takes one so far. It’s truly the amount of time you dedicate to practicing that accelerates your improvement, as well as efficiency in sketching. Take the time to study my early sketches to my later drawings – notice how my lines and earlier graphics seemed scratchy. The scratchiness originated from a lack of certainty, which is demonstrated by picking up my pen multiple times to draw a single line. Please keep in mind that the scratchiness can be a graphic presentation style, but in this specific case, it’s important to know the difference between confidence and style.

Drawing Exercises

The few exercises below are great ways to start improving your drawing ability! Just like any skill, it takes patience and constant practice to see the fruits of your labor.

  • Grid Technique
  • Copying Drawing Styles
  • Don't Lift Your Pen
  • Drawing Basics

Place a grid on your chosen image, and draw the same grid on your paper. Then work through drawing each square one by one. This exercise is an amazing tool to practice scaling up or down and the level of detail you want to explore. Scaling up an image allows the opportunity to explore more shading and detailing versus scaling down, which forces you to focus on specific elements that will make the illustration legible.

To further this exercise, flip your chosen image upside down and draw it that way with your grid too. Flipping the image upside down tricks your brain into not recognizing the image you are drawing, making you focus more on the light and shadow than actually drawing that image!

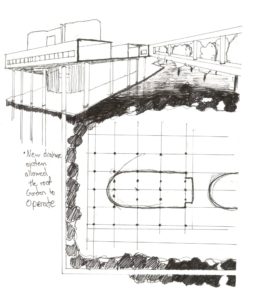
Similar to studying architectural masters, the same can be done for sketching! Below, you'll find my sketch of Villa Savoye designed by Le Corbusier, where I utilized a technique that blends multiple views or drawings into one big graphic of the entire project.

The exercise is in the name. The objective is to practice your ability to make a clear image with fewer lines, or in this case, one line. My professor in Europe wowed us when he drew the entire class's faces for fun!!

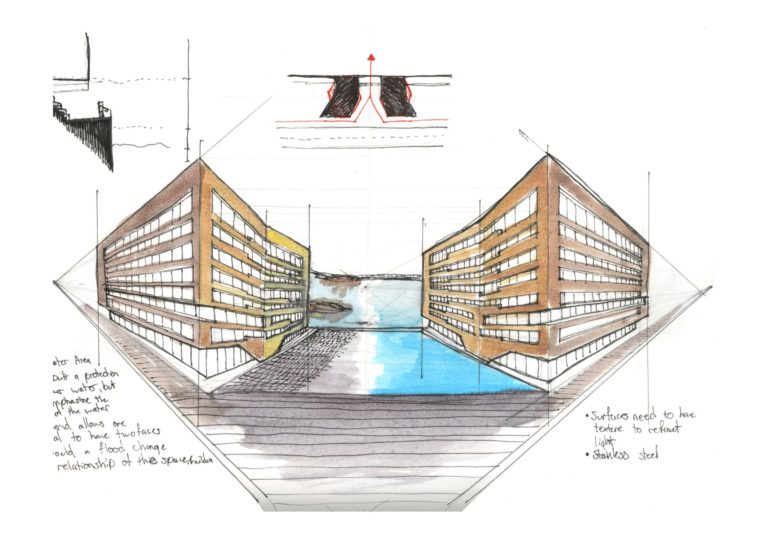
Sometimes we get too sucked into trying to produce a "good" sketch, drawing something repeatedly, only to feel frustrated. This is a good time to practice basics such as light and shadow, line weight and hierarchy, and texture by drawing an object that's in front of you.

Be Intentional

In a presentation, you’re intentional about which graphics to display so your concept can be digested and understood. Similarly, you’ll want to be intentional about your sketches too. What type of information would you like to convey to both yourself and others? Although important for your drawings to be understood by others, if the information isn’t clear or defined by you, it could demonstrate a disconnect between your drawing and viewers.

And sometimes… don’t be. Ideas are messy and often initially come out that way. It’s okay to scribble, make messy notes, brainstorm, and layer trace on top of the trace. Just starting and getting your ideas on the table is a great way to beat out any feelings of procrastination and get a better picture of what’s going on in your head

If a bigger sketchbook is available, you can consider your sketches’ composition and how the information relates to each other. When in Europe, I restricted myself to sketch on one or two pages per project visited, which forced me to be intentional about the space usage and information I wanted to take away in each project.

Although the perspective is skewed in the drawing above, making it difficult to interpret, the sketch’s composition shows two identical buildings in plan, section, and perspective. The concept behind this sketch was to illustrate the relationship between the two volumes, but also the buildings’ association when the river is flooded or not.

Play with Media

Another tip to improve your drawings is making use of varying line weights and media! It’s common to find yourself drawing in one medium, but it’s important to be explorative in the way you express concepts. This also includes utilizing line weights to indicate hierarchy in the information you draw. Consider using charcoal, watercolor, colored pencil, brush pens, wide tipped pens, or take a stab at pastels.

The drawing below happens to be one of my favorites, but I technically drew this sketch at least 4 times! The first take was drawing in pencil to get the proportions right. Next, I clarified my lines with a black pen. After, I added some depth with a light touch of colored pencils and ended it with a watercolor wash.

Chapel of Reconciliation in Berlin, Germany

Sketches are an important way for you to understand a project, so each illustration will vary depending on how you interpret it. We hope these tips and techniques will help your drawing journey as you begin to practice!ย Sharing is caring! We hope to provide you with valuable insights and share them with someone who might find this useful. Make sure to follow our Youtube and Instagram for more content!